
Civil interfaces, structural clearances, electrical provisions, and the coordination failures that turn a two-day installation into a two-week problem
Bar screen installation failures rarely involve the screen itself. The screen arrives on site in good condition, the mechanical components work as designed, and the vendor commissioning engineer knows what they are doing. Forming the civil structure before equipment dimensions are locked is the most common coordination failure. Electrical supply specifications that arrive too late cause delays. Discharge chutes that fail to reach the compactor inlet create site modifications. Access platforms with no room for a maintenance technician create long-term operational problems. Bar screen installation is fundamentally a coordination problem. This guide covers the site requirements to resolve before equipment procurement closes — not during installation, when changes are expensive and delays are operational.
This guide focuses on mechanically cleaned bar screens in municipal headworks channels — front-raked and back-raked designs. Industrial pretreatment installations follow the same principles.
The Water Environment Federation addresses headworks civil and structural design in its Manual of Practice series, including channel geometry requirements, isolation gate provisions, and headworks building ventilation standards that form the backdrop to equipment installation.
Civil Structure Requirements: Get These Right Before Pouring Concrete
The civil structure defines the physical constraints of the installation. Corrections become expensive once concrete is poured and walls are formed. Every civil dimension should match the final equipment drawing. Not the preliminary drawing, not the catalogue schematic — and certainly not assumptions carried forward from a previous project.
Channel Width
Channel width must accommodate the screen frame plus maintenance clearance on both sides. The screen frame width equals the design channel width — this is the hydraulic dimension. But the frame itself has structural members, guide rail supports, and drive housings that extend beyond the bar array. Total frame width is typically 100–200 mm wider than the hydraulic opening on each side.
On top of the frame width, allow a minimum of 150 mm clearance between the frame edge and the channel wall on each side. This clearance serves installation — the frame must slide into the channel without binding — and for maintenance access to frame bolts, guide rail attachment points, and any components mounted on the frame sides. On back-raked screens, the downstream drive mechanism requires additional clearance — often 300–400 mm — for the access panel to open fully. Check the access envelope against the manufacturer drawing before the channel walls go up.
Channel Depth and Invert Level
The channel invert level determines the submergence depth of the screen and the total frame height required. Frame height equals water depth plus freeboard above the water surface plus the drive mechanism clearance at the top. For a channel with 2.5 m water depth and a screen discharging at 1.2 m above the operating floor, the frame height is approximately 4.0–4.5 m.
Invert levels must account for the screen’s headloss contribution. Set the downstream channel invert lower than the upstream invert by the maximum design headloss. For a 6 mm screen at peak blocked condition, this is typically 300–500 mm. If both inverts are set at the same level, the upstream channel will back up under blocked conditions, flooding the upstream wet well. This is a civil design error that appears during the first high-flow event.
Channel Length Upstream and Downstream
Upstream channel length — the straight approach length before the screen — should be at least 3–5 times the channel width. Shorter approach lengths create turbulent, non-uniform velocity profiles at the screen face. Uneven approach velocity reduces screening efficiency and causes uneven screenings accumulation across the bar width. Some bars in the centre will load faster than those at the edges. A rake cycle timed for average loading misses the peak accumulation zones.
Downstream channel length should allow for turbulence dissipation after the screen. A minimum of 2 channel widths of straight run downstream before any bends, junctions, or measurement points is standard practice. Flow measurement devices placed too close to the screen give inaccurate readings due to residual turbulence from the bar array.
Screen Chamber Floor Level
Set the screen chamber floor at a level that drains to a sump. The area around and behind the screen frame will accumulate wash-down water and screenings drips. The chamber floor will accumulate wash-down water, screenings drips, and occasional overflow from the discharge chute. A floor that drains away from the screen and toward a collection sump is a basic hygiene requirement. Flat floors that pool water create slip hazards, accelerate floor corrosion, and produce odour from stagnant organic material. Specify a minimum 2% fall toward the drainage point — include this in the structural drawings from the start.
Isolation Gates: The Feature Most Often Underspecified
Isolation gates upstream and downstream of each screen enable channel isolation and dewatering for maintenance. This is not optional — it determines whether maintenance proceeds safely and without regulatory bypass notification. Yet isolation gates routinely end up underspecified, undersized, or omitted entirely in value-engineered designs.
Gate Types and Selection
Penstock gates — cast iron or stainless steel stop plates — are the standard isolation gate for municipal headworks channels. Slide gates and sluice gates are alternatives for larger channels. The gate must seal adequately to allow channel dewatering — a gate that passes 5–10 litres per second of leakage cannot be practically dewatered without continuous pumping. Specify leakage rate as a performance requirement, not just gate dimensions.
Choose gate actuation — manual handwheel, electric actuator, or hydraulic — based on gate size and operating frequency. Manual handwheels are appropriate for infrequent operation on small gates. Large gates, or those operated frequently as part of flow management, justify electric actuators. Remote operation — useful on dual-channel installations where gate sequencing forms part of the maintenance procedure — requires electrical provision in the civil design from the outset.
Gate Installation Sequence
Install isolation gates before the bar screen arrives on site. During construction, the gate frame gets cast into the concrete channel wall. Setting the gate frame correctly — level, plumb, and at the correct invert elevation — requires construction quality control that is separate from the screen installation process. Adding gates after the channel walls are formed requires core-drilling and grouting — expensive and structurally inferior to cast-in installation.
Structural Provisions for Screen Support and Loads
A bar screen is a heavy piece of equipment — typically 500–2,500 kg for municipal duty sizes — supported at the channel walls and floor. The civil structure must carry these loads — including dynamic loads from the rake mechanism during operation.
Floor Mounting and Anchor Bolts
Most screens mount to the channel floor via anchor bolt groups cast into the concrete. The anchor bolt pattern must match the screen frame base plate exactly. Get the anchor bolt layout drawing from the screen vendor before the concrete goes in. Setting anchor bolts from a sketch almost always puts them slightly out of pattern. Slotted holes, re-drilling, or chemical anchors in cured concrete follow.
Chemical anchors in concrete are structurally adequate when correctly specified and installed. However, they require cored holes, correct resin type for the concrete strength and environment, and curing time before loading. They add cost and schedule delay relative to cast-in anchors. Avoiding them is straightforward — get the anchor bolt drawing early and build it into the reinforced concrete design.
Wall-Mounted Components
Many screen designs include wall-mounted guide rail supports, drive mechanism brackets, or discharge chute supports. Each of these requires cast-in anchor points or embedded plates in the channel walls. Identify all wall-mounted components from the vendor’s installation drawing and provide the corresponding embedments in the structural design. Drilled-in anchors in masonry or concrete block walls are not adequate for dynamic loads from a rake drive mechanism.
Overhead Lifting Provision
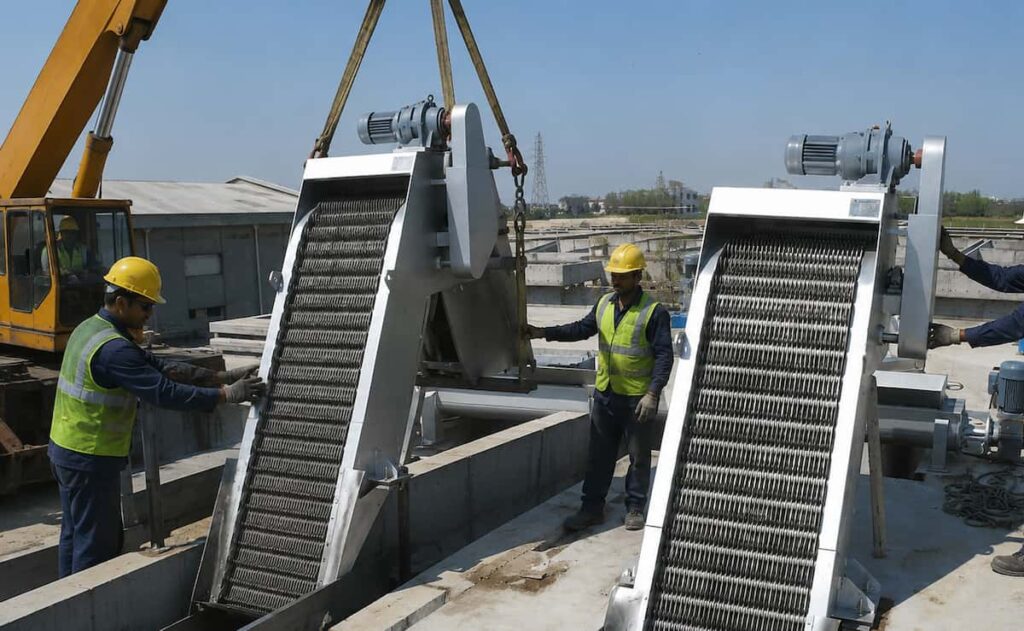
Screen installation requires lifting equipment — typically a mobile crane for initial installation, and a fixed lifting point for subsequent maintenance. A monorail beam or davit arm over the screen chamber lets the operations team lift out the screen frame, rake assembly, or drive unit. No mobile crane needed on site. This provision must be built into the headworks building structure during construction. Retrofitting a lifting beam into an existing building is significantly more expensive than including it from the outset.
Minimum lifting capacity should accommodate the heaviest single component that will need to be removed for maintenance — typically the full screen frame or the rake and drive assembly. Obtain the component weights from the vendor and specify the lifting provision accordingly, with a minimum 25% overload margin.
45,000 m³/day plant, dual-channel headworks with front-raked bar screens. The civil contractor formed the screen channels based on preliminary equipment drawings issued at tender stage. By the time procurement was finalised, the screen vendor had revised the base plate and anchor bolt pattern — driven by a drive mechanism design update.
As-built anchor bolt positions were 85 mm off-pattern relative to the final equipment drawings. Drilling chemical anchors into the already-cured base slab added roughly three weeks and approximately $18,000 in unbudgeted remedial work. Value engineering had also dropped the downstream isolation gates from the civil contract. The absence came to light during installation, when someone wrote the maintenance procedure for the first time. Adding penstock gates to the formed concrete channels required saw-cutting and grouting — a further $22,000 and two additional weeks. Both problems were entirely avoidable through early coordination between the civil and equipment procurement packages.
Electrical and Controls Provisions
Bar screen electrical requirements are straightforward but must be confirmed early. Late electrical specification reliably delays installation. Conduit routes cross already-completed structural elements. MCC cubicles get sized for different equipment. Instrumentation cables end up through incompatible cable trays. All of these are consequences of electrical design that lags behind equipment procurement.
Power Supply Requirements
Confirm motor voltage and phase requirement with the screen vendor before the MCC is designed. Most industrial bar screens operate on three-phase 380–415 V supply. The motor power rating — typically 0.75–3.0 kW for the rake drive — determines the cable sizing and circuit breaker rating. Variable frequency drives are standard on modern screens with speed-controlled rake mechanisms. VFD requirements — input filtering, output reactor, cable screening — should reach the electrical designer before MCC specification is finalised.
A separate power supply for the screen control panel is good practice, independent of the MCC. Panel-mounted controls — run/stop, manual cycle initiation, alarm acknowledgement — should be at a height accessible from the operating floor, not from the top of the screen frame. Confirm the panel mounting location from the installation drawing and provide appropriate structural support and conduit routes in the civil design.
Instrumentation: Headloss Sensors
Headloss-triggered control requires differential pressure measurement between the upstream and downstream sides of the screen. Two options are common: ultrasonic level sensors at the water surface upstream and downstream, or differential pressure transducers connected to tapping points on the channel walls.
Ultrasonic sensors require unobstructed line of sight to the water surface. Spray, foam, and turbulence near the screen face interfere with ultrasonic readings. Position sensors at least 1.0–1.5 m from the screen face, and confirm that the sensor mounting bracket does not obstruct the rake travel path. Differential pressure transducers require tapping points cast into the channel walls — 50 mm threaded sockets at the correct depth below minimum water level on each side. These tapping points must be in the civil drawings before the channel walls are formed.
Lighting and Ventilation
The screen chamber is a confined space for maintenance purposes. Adequate lighting — minimum 300 lux at the channel floor level — is a safety requirement, not an optional extra. Light fittings in the headworks building need a corrosion-resistant rating — IP65 minimum, vapour-proof preferred. Hydrogen sulfide and moisture from the incoming sewage degrade standard fittings rapidly.
Ventilation serves two functions: odour control and safety. Headworks buildings should maintain a slight negative pressure relative to the exterior — drawing air inward rather than allowing odorous air to escape. Ventilation rate should achieve 6–10 air changes per hour minimum. The ventilation design must account for heat gain from motors and drives in a building that may have limited natural ventilation. In warm climates, a headworks building that reaches 45°C in summer creates both equipment reliability problems and occupational health issues for maintenance staff.
Discharge System Integration: The Interface That Always Causes Problems
The interface between the bar screen discharge chute and the downstream screenings handling equipment is the most common source of installation problems. Two vendors are involved. Each vendor’s scope ends at their own equipment boundary. Nobody owns the interface — unless the specification explicitly assigns it.
Discharge Height Verification
The bar screen discharge chute terminates at a fixed height above the channel floor. The screenings compactor or conveyor inlet sits at a fixed height above the building floor. These two heights must be compatible — screenings cannot travel uphill under gravity. The difference between them determines whether a direct chute connection is possible or whether a conveyor is needed to bridge the gap.
Height Compatibility and Chute Geometry
Verify discharge height compatibility at the equipment drawing stage — before either piece of equipment is manufactured. If a conveyor is needed, add it to the project scope before procurement orders go out. Discovering this gap during installation means either an emergency conveyor procurement or an improvised arrangement that operations teams tend to keep for years after commissioning.
Chute Geometry and Material
The discharge chute must slope at a minimum 55° from horizontal to allow self-draining of municipal screenings at 70–80% moisture content. Shallower slopes cause screenings to accumulate in the chute between rake cycles. The accumulated material then falls in clumps — creating surge loads on the compactor and bin-level management problems.
Chute Surface Finish and Bypass Gate
Chute interior surfaces should be smooth — polished stainless steel or UHMW-PE lining. Weld seams and fasteners in the flow path create adhesion points. Operators manage these with water sprays, which adds to the washwater volume and the odour management burden. Specify chute interior finish as a procurement requirement — not a site modification after the problem is observed.
Bypass Provision and Contingency
Bypass Chute and Compactor Contingency
When the compactor goes offline for maintenance, screenings need somewhere to go. A bypass chute or drop connection from the bar screen discharge chute to a large skip bin — bypassing the compactor — allows the screen to continue operating during compactor downtime. This bypass arrangement should be in the design from the outset. It requires a diverter gate or a second discharge opening on the chute, plus a dedicated skip position adjacent to the main compactor skip location.
The discharge interface problem repeats on almost every headworks project where the bar screen and screenings compactor are procured from different vendors under separate purchase orders. The fix is simple: assign interface responsibility explicitly in the specification. Either the screen vendor is responsible for the complete discharge connection to the compactor inlet, or the compactor vendor is responsible for the inlet connection to the screen discharge point. One vendor, one responsibility. Without this assignment, both vendors design to their own boundary and leave a gap that the site team has to resolve under time pressure during installation.
Access Platforms and Maintenance Planning
Maintenance access determines whether the scheduled service actually happens on schedule. A screen requiring confined space entry permits, a mobile crane, and a two-person team for chain tension adjustment will not see that adjustment at the manufacturer-recommended interval. Poor access planning is the single most reliable predictor of deferred maintenance and consequential equipment failure.
Platform Height and Reach
The operating platform should allow an operator to view the rake discharge and the discharge chute from a safe position. Minimum platform width is 900 mm for a working platform and 600 mm for a passage. Handrails at 1,000–1,100 mm height on all open sides are a regulatory requirement in most jurisdictions.
For maintenance access to the drive mechanism — motor, gearbox, chain tension — the platform must allow a technician to reach the drive components with tools. On front-raked screens, the drive mechanism is on the upstream face. Access from the downstream platform requires leaning over the channel — not acceptable for regular maintenance. A dedicated upstream platform — or a removable work platform spanning the channel — solves this access problem. This platform support structure must be in the civil design.
Lifting Points and Removal Routes
Plan the component removal route before installation is complete. The screen frame, rake assembly, and drive unit must each be removable from the chamber for inspection or replacement. Map the removal path: lift vertically, move horizontally to a staging area, lower to a maintenance trolley. Each step requires clearance confirmed against the building structure, pipework, and adjacent equipment.
Common conflicts include overhead pipework blocking the lift path, adjacent equipment blocking horizontal movement after lifting, and doorways too narrow for the screen frame to exit. Identify and resolve these conflicts at the design stage. Discovering them during the first major maintenance shutdown adds cost and delay at the worst possible time.
Textile plant, 9,000 m³/day. An architect who had not been briefed on maintenance access requirements designed the headworks building. The building was well-proportioned and adequately sized for the equipment footprint. However, the access door sat on the short end wall — 2.4 m wide, 2.2 m high. The bar screen frame was 1.8 m wide and 3.8 m tall.
At first major maintenance — approximately two years after commissioning — the operations team discovered that the screen frame could not exit the building through the door. The frame had to be partially dismantled inside the building to remove it in sections, then reassembled outside. The exercise took nearly three days instead of the planned eight hours. A wider access door came up during design but did not make it into the architect’s brief. The additional door cost would have been under $3,000. The first unplanned maintenance event cost significantly more in labour alone.
Pre-Installation Checklist
The following items should be confirmed before the bar screen and associated equipment arrive on site. Each item represents a coordination point that, if missed, causes installation delay or post-installation modification cost.
Civil and Structural
Channel width confirmed against final equipment frame drawing with maintenance clearances. Channel invert levels set with correct upstream-downstream differential for design headloss. Anchor bolt pattern matches final equipment base plate drawing — cast-in bolts, not chemical anchors. Wall embedments for guide rail supports, drive brackets, and discharge chute supports installed. Isolation gates upstream and downstream of each channel — installed and tested before screen arrives. Screen chamber floor sloped to drainage sump at minimum 2%. Overhead lifting provision — monorail or davit arm — installed with rated capacity confirmed. Access door width and height sufficient for largest component removal.
Electrical and Instrumentation
Power supply cable to screen MCC or local panel — correct voltage, phase, and ampacity. VFD specified and procured if required — not added as site modification. Headloss sensor type confirmed — ultrasonic or differential pressure — with tapping points or mounting brackets installed. Control panel mounting location with structural support and conduit routes complete. Lighting at 300 lux minimum at channel floor level, IP65 rated. Ventilation system operational before screen commissioning.
Discharge System
Discharge height compatibility confirmed — bar screen chute height versus compactor inlet height. Chute slope confirmed at minimum 55° from horizontal. Bypass chute provision with diverter gate or dedicated skip position. Interface responsibility assigned to one vendor in writing — not left to site coordination. Washwater supply for compactor — dedicated line, correct pressure, local isolating valve.
| Area | Key Requirement | Confirmed By | Timing |
|---|---|---|---|
| Civil | Anchor bolt layout matches final equipment drawing | Civil engineer + equipment vendor | Before concrete pour |
| Civil | Isolation gates cast-in upstream and downstream | Civil engineer | Before channel walls formed |
| Structural | Lifting provision rated for heaviest component | Structural engineer | Before building structure complete |
| Electrical | VFD specification matches screen drive requirements | Electrical engineer + screen vendor | Before MCC manufacture |
| Instrumentation | Headloss sensor tapping points in channel walls | Instrumentation engineer | Before channel walls formed |
| Discharge | Chute height compatible with compactor inlet | Both vendors + project engineer | Before either item is manufactured |
| Access | Door opening sufficient for frame removal | Project engineer | Before building design is finalised |
Commissioning Readiness
Bar screen commissioning requires the site to be ready before the vendor commissioning engineer arrives. An engineer who arrives to find the power supply incomplete, the headloss sensors unmounted, or the discharge chute not connected to the compactor will not be able to commission the screen. Their day rate continues while site works catch up.
Pre-Commissioning Checks
Before calling the commissioning engineer: confirm power supply is energised and correct voltage verified. Confirm the channel is hydraulically connected and can carry flow through the screen. Verify the discharge system is complete and the compactor is operational. Check all anchor bolts are torqued to specification. Confirm the control panel is powered and communicating with the plant SCADA if applicable. Walk the maintenance access routes and confirm no obstructions.
First-Run Checklist
At first powered operation: check rake travel direction — rake should travel upward on the upstream face for front-raked, or tines should engage from the downstream face for back-raked. Confirm headloss sensors are reading correctly — compare upstream and downstream levels manually against instrument readings. Run three to five manual rake cycles and observe discharge quality. Confirm screenings are falling cleanly into the chute and reaching the compactor without spillage. Set headloss trigger setpoint and confirm automatic cycling initiates at the correct differential.
FAQ
Bar Screen Installation FAQ: Civil and Structural
Bar Screen Retrofit and Building Requirements
Bar Screen Installation FAQ: Contracts and Timelines
Bar Screen Installation FAQ: Contracts and Timelines
Bar Screen Installation: Timeline Expectations
Planning a Bar Screen Installation?
Morvolous Engineering Team reviews civil interface requirements, discharge system coordination, and commissioning readiness before equipment arrives on site. Reach out for a technical review of your installation scope and specification.
Contact Morvolous →